Thursday, December 10, 2009

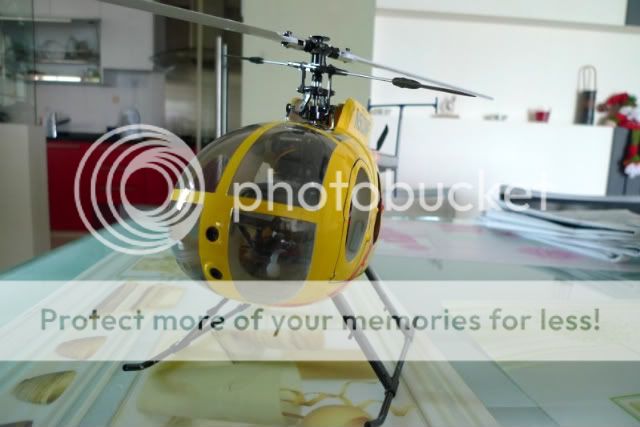
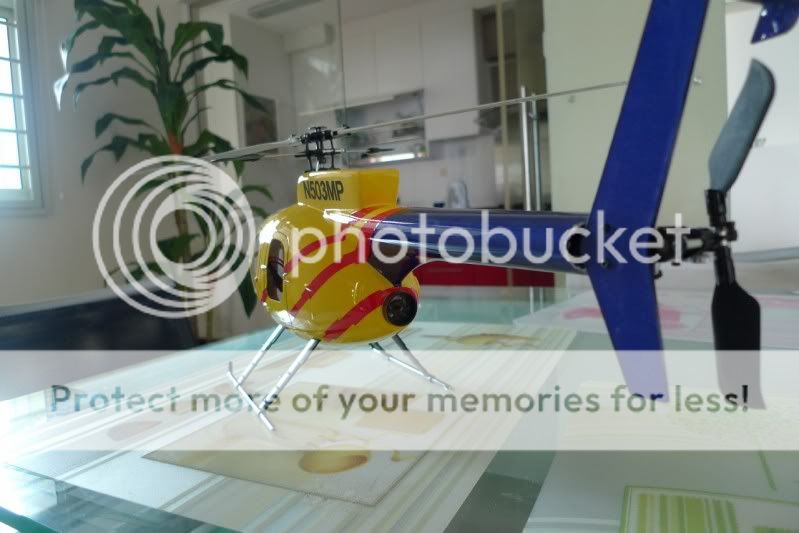
My second scale fuselage (MD500E Huges)

I saw someone selling off a 250-sized MD500E fuselage on Daddyhobby.com for an attractive price and decided to buy it.
The photo below is the completed assembly.

Photobucket
Photobucket

I am using a Trex250 sized rc helicopter to fit into this fuselage. It's a bit of a challenge in the following areas:

1) Rudder servo size - First of all, I have to use a smaller servo for rudder. Prior to that, I was using a Align 502 digital servo for rudder but the size of this servo is too big and it would obstruct the boom insertion into the fuselage. In the end, I used an Align 402 servo which is smaller.

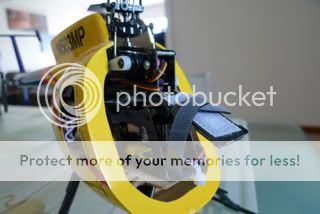
2) Rudder servo position - The next challenge is that I need to move the tail servo all the way back until it is literally touching the end of the boom clamp. This was required in order for the boom to complete extend itself out of the fuselage. Also, I had to find a new position for the servo to a somewhat awkward position (and yet functional)that the rudder controls are not affected.
Photobucket

3) Position of Electronic Speed Controller (ESC) and Receiver - As the helicopter is mounted onto the fuselage skeleton interior, the only available space to mount the ESC and the receiver will be at the side of the heli frame. (Remember, this is a 250 size frame, so the esc and receiver is most unlikely to fit inside the frame).

4) Securing tail boom inside fuselage - I also found out that there is a need to 'secure' the boom once it is inserted through the fuselage. By 'secured', I meant a way to prevent the boom from moving about (due to vibration) inside the fuselage as this would affect rudder and gyro readout a great deal. To overcome this, I simply cut a piece of thick sponge to slightly larger than the fuselage boom dimension. Then I cut a hold for the boom to be inserted through the sponge and pushed the sponge into the fuselage. (Like a ring thru a finger). This way, the sponge will absorb the vibration while keeping the heli boom in place! :-)

Photobucket

5) Tail Heavy - Like the other fuselage I assembled (with the 450 sized heli), the final assembly tends to be tail heavy. Even this assembly was no different. I need to put additional weight, up to 45grams of weight pieces in the front in order to balance the heli perfectly.
Photobucket

Well, I must say that I am damn proud of this fuselage. The final looks of it was really satisfying! It flies ok but due to the additional weight, the overall flight time had to be reduced down to abt 3.5 - 4 mins (previously abt 5.5 mins). The good side of it is that I can now use a larger size 1000mah lipo instead of the previous 800mah batt. This is due to the additional space available in the front of the fuselage. (The MD500 has a big 'head'! :))

Hope you like this and find it informative!

Friday, October 30, 2009

My Phoenixtech Torque Tube TT360 Review and Flight Report

FINALLY! I completed it today! Below are some pictures of the completed TT360.

Completed Assembly
Photobucket

Mystery 40A ESC
Photobucket

Scorpion 2221-10 motor w/ 13T
Photobucket

.My fav Gyro (Align GP750).. I know, I know, Spartan is the best... yeah...yeah..
Photobucket

Cyclic Servos (first try at Savox servos)
Photobucket

My faithful little Assan RX
Photobucket

Tail Gear Assembly
Photobucket

Main CF Blades (Beautiful!)
Photobucket

Wanna see the difference in size between the TT360 and a 450 size heli?
Here is a comparison shot between the TT360 vs my 450 SE. :D

Photobucket

And here it is compared to Gaui and Trex250!

Photobucket

The very first hover test video... I am only using a 3S 40C batts for the hover testing. I wanted to check if the blades were tracking properly. And guess what? They were! No adjustments necessary!! :L


I took it out for sport-flying in the evening. Here I am using a 4S dualsky 2200mah batt. I was alone and I mounted a small cheapo, crappy, worthless mini-cam on top of my cap. Unfortunately, the video does not come out clearly..:bh


Some thoughts to share:

1) As mentioned in my previous few post back, I need to increase the swash mix up to 70-75% to achieve +- 12 degress of pitch and +-7 degrees of cyclic. But even at this value, there were no mechanical binding.

2) I didn't have to do any blade tracking adjustment. I measured them at 0 degrees mid-stick and the blades tracked nicely! (I guess I was lucky?)

3) The rudder servo mounting is different from Rave heli. It is housed in a fixed location but in a horizontal position, unlike the Rave. But because the rudder servo is a fixed position, adjusting the rudder linkage rod to get center position at the rudder requires some effort. You cannot simply 'shift' the rudder servo. Instead you need to loose/tighten the ball links @ the linkage rod ends to get the rudder to center mechanically. Not a big issue, nevertheless.

4) I used a Futaba9257 servo for rudder and I used the default round horn. However, i found out that i cannot get the rudder to move to the extreme end-points. Therefore, my piro rate is slow. I think i will use a longer horn instead.

5) Running 4S with the 360mm blades seems to be the most ideal setup. After 5 mins of sport flying, the esc, motor and batt is barely warm.

6) Overall cyclic response is too slow for me. I am already at 100& flat throttle curve at idel1. Perhaps increasing cyclic pitch might help?

7) Overall stability is definitely better than 450 size heli, but I wouldn't say it flies like a 500 sized.

8) The TT360 has a narrow body width. I cannot even fit my receiver or ESC into the body and they both needed to be mounted on the outside of the frame. Those with spectrum rx may have better luck.

9) Buying blades may be a problem. At the moment, I think only Pang carries the 360mm blades. None of the other LHS or even HC carries these sizes.

10) I need more 4S batts! I only got one at the moment.

Wednesday, October 21, 2009

Got a new addition - Phoenixtech TT360!


I had wanted to get a Phoenixtech 450 PRO which is a 450-sized helicopter but using torque-tube (TT) instead of belt. Then I saw the launch of the Phoenixtech 360TT which is a stretched version of the 450-sized using a 360mm blades with torque tube! (The 450 sized is using only 325mm blades). So i got this baby instead!

I haven't assembled it yet as I just received it a day ago. It's full metal head, with a carbon fibre body and a fibre-glass canopy. There are 2 possible configurations to fly this:

1) Fly it with a 3-cell (3S) lipo batt. But I will need a high KV brushless motor, about 4400KV and with 325mm blades instead of 360mm ones.

2) Fly it with a 4-cell (4S) lipo batt. I will need a 3000KV motor capable of running at 4S voltage and with 360mm blades.

I guess i will go with option 2 since i already am flying my other 450 sized helicopters with 3S. That means, I have to get myself a couple of 4S lipo batts cause I don't have any at the moment.

Some more pics of the TT360 below:


Wednesday, August 26, 2009

Received a fine from the traffic police department!

Can you believe this?!?!

I ended my RC flying on 15 Aug 09 and was loading my planes and stuff into the boot of my car when a TP came, parked behind me and proceeded to take out a small notebook and started to scribble something on it. I gave him an 'acknowledgment' look to tell him that i will leave as soon as i finished loading up my car.

He waited for a while and we both left at the same time and I assumed everything was ok. How wrong was I!!! Because a week after, I received a bloody $70 fine for illegal parking!!!! What the hell?! If he had wanted to give me a ticket, why didn't he give it to me 'on the spot'?! It's not as if I wanted to run away or anything. And bear in mind, I was THERE at the 'time of the offence'! Yes, I was PRESENT at the time of the offence! My car was not left unattended! The road was a deserted road along Punggol Drive. I was not obstructing ANY traffic whatsoever! What traffic? There were no bloody cars on that road!

Under 'normal' circumstances, I believe most TP would just wait and make sure that the drivers does move their cars and only issue tickets to those cars that are still parked unattended. (I have seen this countless times). But in mycase.... geeze! Arse-luck!

Was this TP new on the job? (on the ball)
Was he low on 'quota'?
Was he in a bad mood?

I decided to make appeal at the TP department yesterday. Upon reaching the traffic police HQ, the receptionist asked if i would like to write in to appeal or see an appeal offiicer. She said 'see appeal officer is of course faster lah! But you have to wait a while...here, take this number and take a seat.'

After a long 2 hours wait to see the appeal officer (there was only one at that time), and after I explained my case, all the appeal officer said to me was that I have to 'write-in' so that they could 'verify internally'. What a waste of my time. I could have just spend 10 mins writing and dropped my appeal letter in the box if I had know I still had to write in afterall!

So now my case is 'pending' the result of their internal verification or investigations or whatever... I wonder how they will do their verifications / investigations...

Damnit!

Friday, August 14, 2009

My First Heli Scale Fuselage : A109E Agusta US Coast Guard

I assembled my very first scale fuselage helicopter. It's an A109E Agusta US Coast Guard fuselage. The fuselage kit came with retracts (2 on the back and 1 on the front). The helicopter I used to fit into this shell is a Trex 450 SEV2.

Here are some pictures of my completed prized possession!


It is not easy to fit an entire heilcopter into the fuselage and I had faced various challenges along the way. I will describe these challenges along the way as I hope you can learn a thing or two from my experience.

First of all, you will have to remove the following items from your RC helicopter as these parts are no longer necessary in the fuselage.

1) Landing skids and skid pipes
2) Tail stabiliser + tail fin
3) Tail boom support
4) Canopy (of course! :))

You will need the following items and tools along the way:

a) Small file (for trimming)
b) screw drivers
c) 2 servos for retracts
d) Y-cable for connecting the 2 servos into a single channel (optional if you have a 8 or more channel receiver)
e) servo extension cables (unless your servos have very long cables)
f) weights to correct the CG (believe me, your heli will be tail heavy after assembly)

Challenge 1 - Setting up the retracts
The retract for the rear wheels are damn difficult to setup. Initially I used a HXT-900 9g standard servo for the rear retract but the servo blew out after a while due to the heavy load extended to the servo. So, I used a PowerTech 9g metal gear digital servo instead and this servo is strong and held the landing gear in place well.

For the front retract, I only used a Hitec HS-65 carbonite gear servo and it seems to do the job fine.


Challenge 2 - Tail
Before you pushed the helicopter into the fuselage, you MUST remove the tail assembly, leaving only the belt. Otherwise, your tail rotor assembly would be too big to go through the fuselage body.

Removing the tail assembly is easy, but putting it back together with so little room to screw the parts together is a challenge! And please make sure that the belt is turning the tail rotor in the right direction before you screw the assembly tight together!!!

The other challenge I had while fitting the helicopter into the fuselage is the tail. The pre-cut opening for the tail is a little too far back. The tail of the helicopter is unable to fully reach to the opening access. The reason for this is that there are also restrictions on how far back the helicopter can be pushed into the fuselage due to the obstruction of the rear retract servo housing compartment in the fuselage.

In the end, I had to do use a small file to trim the opening a little large in order to accomodate the tail .


Challenge 3 - Getting the right height
You have to remove the landing skids of the helicopter because your helicopter has to 'sit' in the fuselage. The kit comes with many small pieces of wood which you have to secure in place of your landing skid and you need to put the right amount of wood in order to ensure that your heli sits in the fuselage with the right amount of height so that the tail boom is extended as parallel to the back of the fuselage as possible.

So please measure the height you wanto achieve with the right no of pieces of wood you need to stack together BEFORE you start to epoxy/glue the wood together! I learned this the hard way. I simply used ALL the wood, epoxy them all together and then later found out that the helicopter was sitting too 'high' up in the fuselage and the tail boom was unable to insert into the fuselage without rubbing. I had to resort to cutting away the excess wood in order to get the right height! What a waste of time and effort! :(


Here is a short video of my completed Agusta A109E!


And here are the retracts in action!

Tuesday, May 19, 2009

China Funjet

Recently i acquired a China-manufactured Funjet from AerialHobby. Although it's called 'Funjet', there are some distinct differences in the looks department between this and the Multiplex version. I will cover the differences between the 2 in this post.


The left one is the Multiplex Funjet and the one on the right is the Skyatech Funjet (China).

Differences :
1) Size
The Skyatech funjet is larger in overall size. This is due to the larger wing area of the Skyatech version. As a result, it is a great floater. I can cut my throttle during flight and it would glide in the air for ages! Therefore, landing is pretty easy with the Skyatech version.

2) Canopy / Internal housing compartment
The canopy of the Skyatech funjet and internal housing compartment is HUGE! I am talking almost the entire top of the plane is the housing compartment! There is some much room inside that you can place your batteries, ESC and receivers almost anywhere to setup your CG point! Don't get me wrong, the Multiplex Funjet also has a lot of housing space as it is based on long-and-narrow concept, but half of the Multiplex version is difficult to access because the canopy only covers half of the plane while the other half is pretty much CA-ed onto the plane. For the Skyatech Funjet, the entire top of the plane is basically the canopy! So access to the electronics is very easy and setup is simple as well!

Unfortunately, because of the large canopy size, it does not not clip-on to the body very well. I have seen many canopies of the Skyatech flew off during flight. So i would strongly recommend to find an alternative way to secure the canopy, like using magnets, or velcros etc..

3) Motor mount
The Multiplex version has a great motor mount in my opinion. The motor is housed inside the fuselarge and it is protected. The Multiplex version also a motor mount which enables flyers to adjust the trust angle easily by turning a single screw. The housing design is also large enough to house motor size from 20 - 36mm sized motor easily.

The Skyatech funjet is simply a metal stick mount screwed onto a plastic holder and in return, CA-ed on the back of the plane. Again, i strongly recommend to remove the plastic holder and re-CA once again as i discovered that the factory did not put sufficient CAs to hold the plastic holder down in place. You wouldn't want the entire motor mount to dislodge during flight! Trust me on that one... You can see from the photo that the motor will be exposed based on this design and there is no easy or straight forward way to adjust the trust angle.

Due to the small metal stick mount, i found out that it can only hold motor size of 28mm at maximum. And if you are using a 28mm rated-size motor with heatsink, the effective diameter of the motor would exceed 28mm and you can forget about using the stock mount as it will not fit at all!

4) Wing Reinforcement
Multiplex funjet comes with a plastic long tube which runs across the wings to act as reinforcements to prevent the wings from warping or breaking during high-G manueovers.
Unfortunately, the Skyatech version does not come with any reinforcement rods, although there are already pre-cut groove on the wings. So you should purchase carbon rods of about 3mm in diameter size and fit it into the wings of the Skyatech funjet as additional reinforcements.

Well, that's about all i can tell in terms of differences. Flight report coming up next...

Wednesday, May 6, 2009

My latest addition! A TRex 500 Clone! (JY500)


After flying 450-sized helis for 3 years, I finally 'upgraded' and got myself a TRex-500 clone. It's called the JY500. I bought this from www.aerialhobby.com, a local online hobby e-store. It's a replication of the famous T-Rex500 (Carbon Fibre) Edition. It completely identical in every way to the original Align one but this is like 3 time cheaper!

It's a full metal head assembly, carbon fibre frame and a fibre-glass canopy.
It does not come with any manual but this was not really a problem as i can simply download the Align's TRex500 manual and use it to assemble the heli since it is an exact replication.

First impression is that a 500-sized heli is substantially larger than a 450-sized heli. I mean, this thing is huge in my opinion! I should have taken a shot by putting my 250, 450 and 500-sized heli together so that the size comparison can be seen.


My electronic setup are as follows :
Cyclic Servos : Hitech HS5245MG
Rudder Servo : Futaba 9254
Gyro : Align GP750
Motor : Scorpion HK3026 - 1600KV brushless with 13T pinion

This setup , coupled with a 6S2650 Zippy Flightmax Lipo battery gave me plenty of power for 3D manuovers and a good 5 mins flight! The heli seems more stable than a 450 sized one. I have more time to correct my inverted hover. As I haven't had too many flights on this heli yet, plus I am 'running it in' currently, I haven't been able to do the other harder 3D moves like tic-toe, stationary rolls, flips yet.... but soon.... :)

Tuesday, April 7, 2009

Got my TRex 250 flying properly....finally!

Back in Feburary, I was having a lot of problems getting my TRex 250 to fly properly. I had lots of problems with tail wags, sluggish cyclic responses and getting the right pitch setup. Well, all that has changed, thanks to Bob Finless over in Helifreak.com for his setup videos on the TRex 250. I watched all his setup videos on the 250 and learnt a whole new bunch of stuff. I also found out what i was doing wrong and some new techniques on setting up the heli properly. I also changed a couple of things in my 250 to improve the performance and stability. Here are the list of changes i had made :

1) Tail Servo change
Change the tail servo from the stock Align 420 to the Hitec 5084 servo. The stock tail servo didn't seem to work properly and i would sometimes get a sudden lost in tail hold. Maybe it was dying. I read from the local forum that the Hitec 5084 was a good replacement so got my hand on one of those to try out. I guess i won't be going back to the stock servo anymore... :)

2) Tail linkage rod mod
The stock tail linkage rod was pretty thin and it would sometimes bend. This would have an undesireable effect on the tail and I decided to strengthen it by putting a metal rod into a hollow carbon rod. Now the rod stays rigid throughout.

3) Change the motor pinion
With the stock 15T pinion on the stock Align motor, i felt that i wasn't getting all that punch i needed, especially for 3D. So i change it to a 16T pinion instead and performance was better.

4) Crank up that throttle curve!
I am running a flat throttle curve 100-100-100 at idle1. Anything lower and i get sluggish performance. Flight times is abt 4 min with stock motor and 16T pinion. I am still contemplating if i should drop in a Scorpion motor... (hmmm....)

5) Ditch the stock ESC!
I got myself a Castle Creation Pheonix 25A ESC in replacement of the stock 15A ESC. The CC ESC are simply the best for heli. They have one of the most comprehensive software settings for heli and the firmware are constantly being upgraded! I love these and they don't run as hot as the Align stock ESC!

6) Watch that Gyro gain!
After watching Finless videos, I realise that my gyro gain was simply too high (i was at 60 - 65% previously) and they probably are the MAIN REASON why i was having so much trouble with my tail hold. I tune it down to 40 - 50% and immediately, the tail was holding great!

7) CF Blades
Last but not least, I got myself a pair of CF blades to replace my stock ones. And man, that made a difference. The flight is a lot less spongy and cyclic response also improves!


Those are the things i have change since my last blog in Feb. Well, at least now i am able to have a decent 4 mins of flight time (not hover) instead of 4 mins of 'struggling' time to keep the heli in control.

Time to setup my NIB Gaui200 SEV2 next! .... :p I will see how the 2 helis compare...

Monday, February 2, 2009

T-Rex 250 - Not so easy to get it flying properly!


Sigh, I think I am getting more and more frustrated with my T-Rex250 heli now....
So far, i haven't been really getting too much fun flying it. And here's why:

1) Somehow, i am not getting a lot of lift on it. Even though i am getting -11 0 +11 on pitch, somehow, my pitch stick has to be wayyyy up to get the heli to lift off the ground! WTF???

2) Had a couple of crash already and all due to stupid tail problem... Somehow, the tail will 'lose it' somewhere during the middle of a flight. I mean, it started out holding well, but after a short flight, the tail will simply lose it's hold and start going wild. The next thing is.... crash.... to the ground...
I have even went to extend of changing the tail hub to the new unit but it seems to be even worse! I have also change the tail servo, after reading from forums that the stock tail servo is not as good, but that does not seem to fix the problem either! WTF???

3) The parts are really tiny and small! Repair is sometimes impossible with those tiny stupid hex screws which are only 0.9mm sizes! And to make matters worse, my stock hex wrench seems to have 'worn off' - i can't seem to tighten/loosen those small hex screws properly now! WTF???

4) Due to some wear and tear, those tiny hex screws now cannot seemed to be able to be removed.... some of my parts are stuck and cannot be removed now! WTF???

Just on Sat, i have crashed it again, due to lose of tail control, as usual! This time, the crash is not as bad as previous but i have yet to see if i can remove those damaged parts properly as i fear the small hex screws holding those parts might have been worn out making it impossible to remove... (fingers crossed!)

Hmmm..... i think i will stick with my 450-sized helis instead.... perhaps time to put the T-250 up for sale.... :(